Sew in weave is a popular method to get a head of beautiful hair. Sew in hair extensions are applied by sewing the extension hair onto your existing hair. Side part sew in can be done with any hair type, and is often more flattering with thicker hair.
What is Sew In Weave
sew in hair weave is applied by sewing the human hair strands to your own hair. It is a classic method to install hair extensions, and it is very natural and secure. Sew in weave is a protective hairstyle for it will protect your own hair from breakage and styling.
Side part sew in is the perfect hairstyle for women who have less hair. Side part style will add a little bit sexy, mature to you. Moreover, side part hairstyle can shape round face.
How to Install Side Part Sew in With a Closure
Tips to Install Side Part Sew in With a Closure
1. Preparing Your Lace Closure
Before having a side part sew in with a closure, choose a lace closure that can have a side part. A free part closure or three part closure will works. If your closure is not been bleached, go ahead and bleach the knots on your closure.
2. Hair Color Choose
You want to make sure the hair color of your hair bundles and lace closure will perfectly match the texture of your own hair. If you have a leave out, it will looks more natural.
Step to Step Side Part Sew in With a Closure
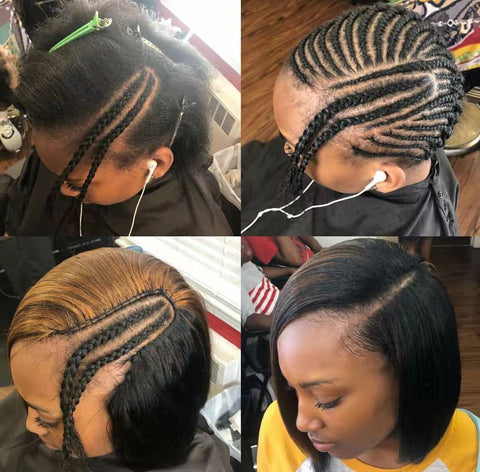
1. Braiding your hair.
Braid your hair flat down and have a side part. Start by creating a side part in your hair. You can use a rat tail comb to help you create the perfect part. Then begin braiding your hair, make sure the hair will be flat and smooth.
2. Wearing a mesh cap.
Get a mesh cap that suit your head size and sewing off the area in which your closure will be sitting.
3. Start sewing
√ Sewing in hair weave
Start sewing from the back horizontally, you can having like a small mirror in front of you with a big mirror in the back of you so that you can see clearly. Use the flip over method mostly and once get to the top, you should cut the tracks to make it as flat as possible.
√ Sewing in lace closure
Once finish sewing in hair weave all the way up to the top, go ahead to put your lace closure on. If you glue in your lace closure, cutting off the little flaps on the side so that it can lay down really flat on the side. If you sew in your closure, do keep that part on because it really does not make a difference.
Placing the closure on your head where you want to sew it and hold it in place. Make your lace closure flat and then begin to sew on the closure. It is hard to hold, so if you do have help go ahead and ask them to hold it for you. Anchoring the thread to the track stents on the side to the closure and sew in your closure.
How To Install Side Part Sew In Without A Closure
1. Braiding your hair.
Braid your hair into a cornrow. Create a deep side part and start braiding your hair, make sure the hair will be flat and smooth.
2. Sewing in weave together without a closure
Sew from the back like so a lot of you have seen on Youtube. using a straight or curve needle and sewing your hair bundles into the cornrow.
Make sure that when you get to the end flip it over and continue sewing. it's really easily, you don't have to pass your needle through the weft but just pass it under the wefts and you're good to go.
Sew in hair extensions are applied to sew your weave hair onto your own natural hair. Side part sew in with a closure or side part sew in without a closure to get a full head of beautiful, cute hairstyles in various hair length. Style your sew in weave just like your own hair.
Some Side Part Sew In Styles
There are some fabulous and charming side part sew in hairstyles you can create without damaging your own hair.
#1 Straight side part sew in weave

#2 Water wave side part sew in weave

#3 Kinky curly side part sew in

#4 Body wave side part sew in

#5 613 body wave side part sew in